Week 6 Capstone
- Harry Bushell
- Nov 9, 2023
- 4 min read

The first term of my capstone project is done! 6 weeks in, and I'm pretty happy with my progress so far. I’ve stuck pretty closely to my Gantt chart plan, although my scope has decreased slightly with removing the ball concept and development. Instead, I’ve focused more on creating multiple stud prototypes that offer different ideas for the same outcome (habitat regeneration). I spent most of this week gathering materials and creating prototypes, which I thoroughly enjoyed. I was able to work alongside the FabLab technicians to create a scaled-up 3D model of my mechanical stud concept, as well as discuss and create clay-based seed bomb studs through advice from the head of the UoA pottery department. Going into the mid-semester break, I’m confident with what I’m creating and hope these two weeks can be used productively for testing and further prototyping.
Once again, I’ve asked CARL to help me write this reflection, he’s really becoming a valuable friend to have around. Starting with the context stage, this week was a key milestone in my capstone project plan, focusing on gathering materials, prototyping, and testing. Along with this, I planned to research permit permissions around using green urban spaces in Auckland. I wanted to create multiple physical prototypes that allowed me to get a proper feel for my ideas and also test them in hand.
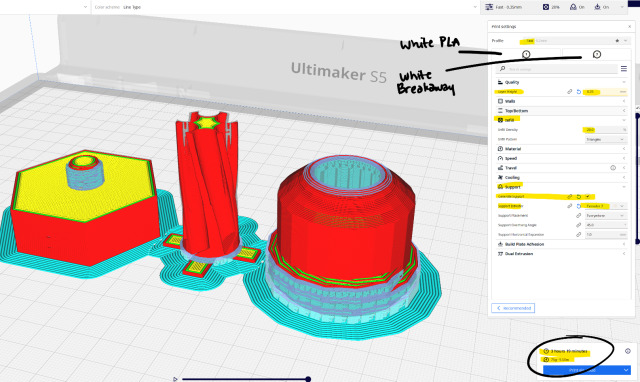
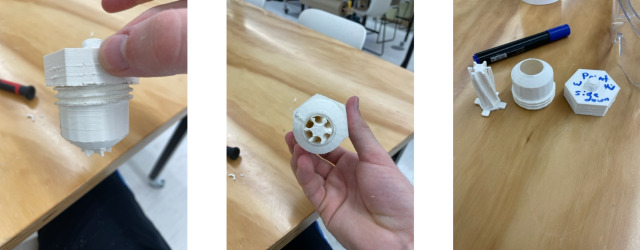
To make this context a reality, I spent a lot of time researching production methods, crafting, driving, and spending (yuck). I developed physical prototypes for both of my stud ideas, with the mechanical twist-stud concept being scaled up three times and 3D printed in the FabLab. I scaled the mechanical model up because it allowed me to better see any flaws in my design, as well as reduced the risk of structural instability from 3D printing something so small. The 3D model was created using white PLA and breakaway through a .8 nozel with a triangular print pattern. These settings were chosen due to the increased printing speed and availability of material. The .8 nozel allows more material to be applied, thus decreasing the printing time, while also increasing the strength of the print. The triangular print pattern was chosen for the same reasons. These settings were then applied in a program called Cura and were transferred to the UltiMaker printers in the FabLab through a .3mf file. Cura was a fantastic tool for this, it provides a view of what your print will look like within the printer, how each layer will be printed, what materials will be used, etc.
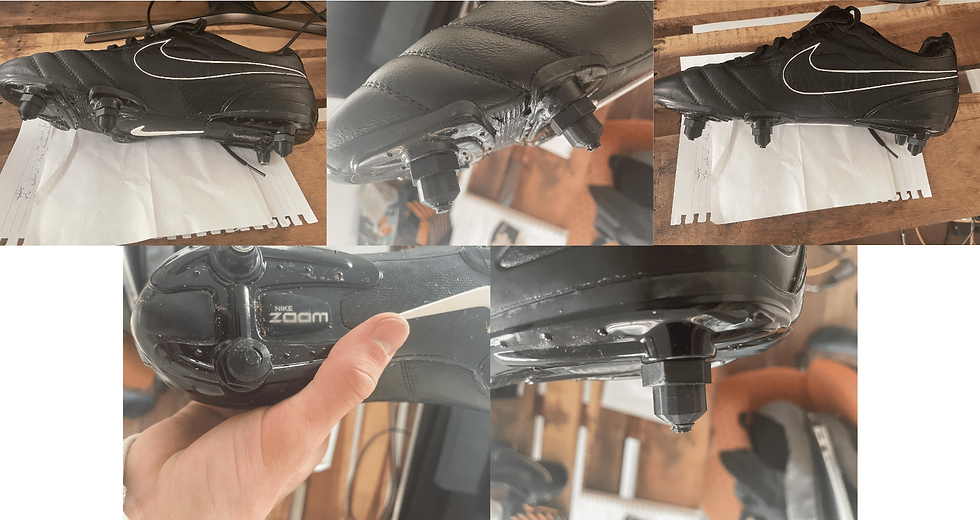
The natural seedbomb stud idea was created from a combination of bee pollinator seed mix, 100% green waste compost, and air-dry clay after a discussion with Steve from the FabLab and Franca from Pottery. The bee pollinator seed mix was used due to its wide variety of supplied seeds, which are all non-invasive, benefit my target demographic, and require minimal care to grow. 100% green waste compost was used to reduce any risks with handling, as compost that also incorporates organic waste can be dangerous to touch. Air-dry clay was used due to its natural malleability and neutrality with my chosen seeds and compost. To make these seedbomb studs, the first thing I did was create a mold of a pre-existing football stud. I created this mold from a mixture of flour, water and salt, which formed a dough that I imprinted the stud into before baking. This allowed me to create a mold with materials I already owned and was a fast and cheap solution that was also highly effective when it came to creating my seedbomb studs.

This resulted in Week 6 being a lot of fun, extremely valuable and productive. I really enjoyed being in the FabLab heaps and spending hours touching up and testing my 3D model. I also found molding the seedbomb studs to be quite therapeutic. Having physical prototypes to iterate and test over the holidays is something I set out to achieve from day one when I created my Gantt chart, and to have this done is a massive weight off my shoulders. Furthermore, the results of my prototypes have been really positive. They work as I intend them to, and with some fine-tuning, I think I’ll have fully functional high-fidelity prototypes done sooner rather than later.
On the learning side this week, I found being able to hold and play with my prototypes taught me a lot, both about the values of prototyping and what iterations were needed for my project to progress. Along with this, I continued to learn the benefits of an achievable plan and sticking to said plan, alongside the gratification and achievement one feels from this. On the practical side, I learnt how to deal with clay, how this can be used alongside molds, how to import files into Cura and export them for 3D printing, what the settings within Cura do, and the painstaking process of land permits in Auckland. Overall, I’m pretty happy with how Week 6 went, and the only thing that’s upsetting me with this assignment is that half of the allocated project time is up!


Comments